
In this article, we will see How to enable the http/2 on apache. The Hypertext Transfer Protocol version 2 (HTTP/2) is the latest iteration of the HTTP protocol, designed to enhance web performance by reducing latency and improving efficiency. Apache, one of the most popular web servers, supports HTTP/2, offering significant performance benefits for websites. In this guide, we’ll walk through the process of configuring HTTP/2 on Apache.
Prerequisites:
- Install Apache
- Install the Necessary PHP Components
- Configure Apache to Support HTTP/2
- Enable HTTPS Support
Verify Apache Version
Before enabling HTTP/2, ensure that your Apache version supports it. Apache version 2.4.17 or higher is required for HTTP/2 support. You can check your Apache version using the following command:
apache2 -v
Install the Necessary PHP Components
To properly configure Apache, you need to upgrade some of your system’s php modules so they are compatible with HTTP/2.
Install the php7.4-fpm module. Disable the older version of this module and enable the new one.
sudo add-apt-repository ppa:ondrej/apache2
apt-get update
Install PHP FastCGI module for PHP 7.4, it is default version for Ubuntu 20.04
sudo apt-get install php7.4-fpm
sudo a2dismod php7.4
sudo a2enconf php7.4-fpm
Enable the proxy_fcgi module.
sudo a2enmod proxy_fcgi
Configure Apache to Support HTTP/2
To enable HTTP/2 support, we have to enable some additional modules and configure the virtual server to allow the protocol.
Disable the mpm_prefork module, which is not compatible with HTTP/2. This module might already be disabled.
sudo a2dismod mpm_prefork
Enable the mpm_event module.
sudo a2enmod mpm_event
Enable the ssl module.
sudo a2enmod ssl
Enable the http2 module to activate HTTP/2 support.
sudo a2enmod http2
Restart Apache to apply all the changes.
sudo systemctl restart apache2
Verify Apache is still active using this command.
sudo systemctl status apache2
Add a line to your Virtual Host file
Add the following line to your site’s current Virtual Host config file. This can go anywhere between the … tags. If you want to serve HTTP/2 for all your sites, add this to your global /etc/apache2/apache2.conf file instead of per each individual site’s Virtual Host file.
Protocols h2 h2c http/1.1
Explanation: h2 is TLS-encrypted HTTP/2, h2c is cleartext HTTP/2, and http/1.1 is ordinary HTTP/1.1.
Having http/1.1 at the end of the line provides a fallback to HTTP/1.1, while h2c is not strictly necessary.
Verify HTTP/2 is Enabled
To confirm Apache is using HTTP/2, visit the website using any browser, and use the developer tools to inspect the incoming packets. The following instructions demonstrate this technique on Chrome. Each browser has its own method of inspecting incoming packets. Consult the browser’s documentation for more details.
- Visit the domain using Chrome.
- Open the Chrome Developer Tools by pressing the F12 key. Select Tools followed by Browser Tools and then Web Developer Tools. This opens a new panel at the bottom of the browser or you can do it separately from the browser.
- Select the Network tab, and reload the page again.
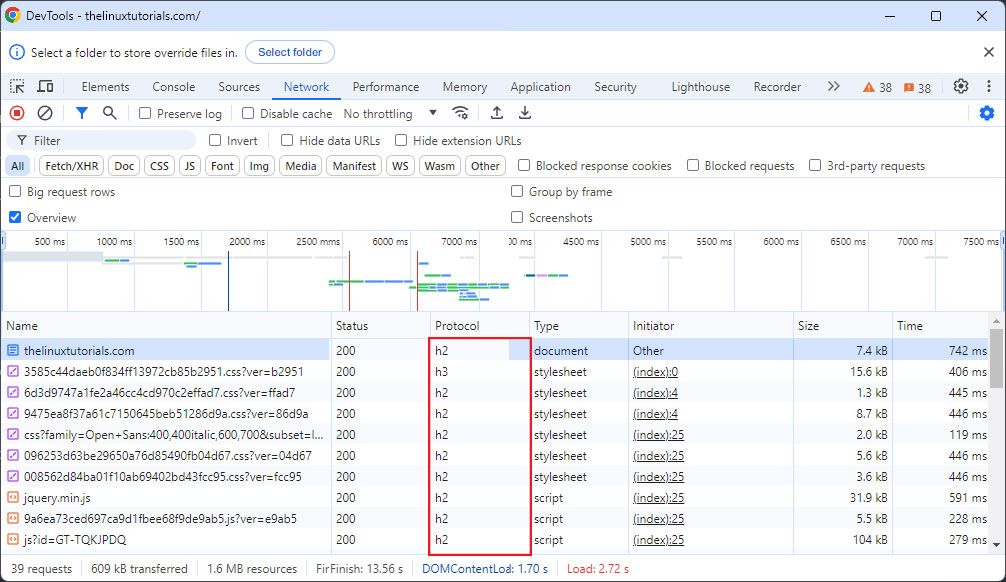
If HTTP/2 is working, the Status reads OK and the version is HTTP/2. Or you can verify if HTTP/2 is enabled by using browser developer tools, online tools like KeyCDN’s HTTP/2 Test, or command-line tools like curl:
curl -I -k -s --http2 https://example.com | grep HTTP
Look for HTTP/2 in the output, indicating that the server supports the protocol.
Conclusion
Enabling HTTP/2 on your Apache server is a straightforward process that can significantly improve your site’s performance and security. By following the steps outlined in this guide, you can ensure that your users experience faster load times and better resource management. As the web continues to evolve, adopting protocols like HTTP/2 is crucial for staying ahead in delivering a seamless and efficient user experience.
Feel free to share your experiences or ask questions in the comments below!